Half-square triangles (HSTs) are a fundamental building block in quilting and patchwork. These versatile units can be used in countless designs, adding depth and dimension to your projects. In this blog post, we’ll explore various methods for creating half-square triangles: one at a time, two at a time, four at a time, and eight at a time, as well as the sheeting and strip methods. We’ll also discuss the pros and cons of each technique to help you choose the best one for your quilting projects.
Creating Half-Square Triangles: One at a Time
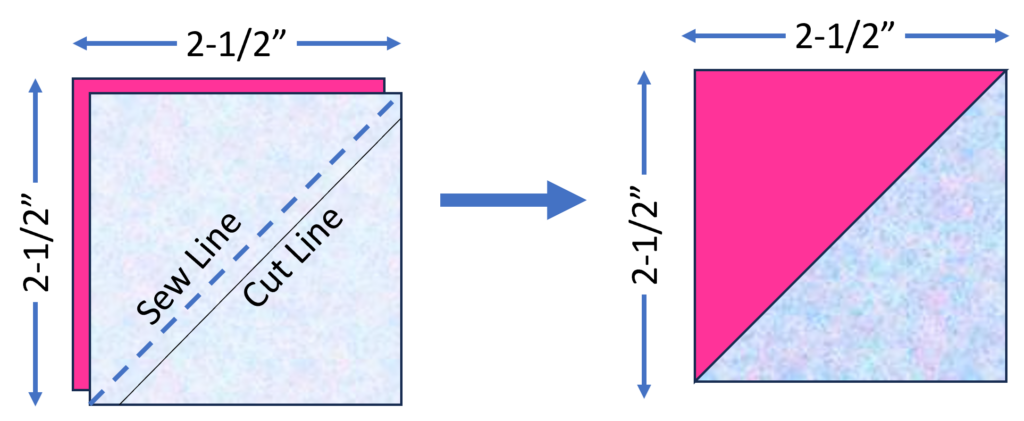
The one-at-a-time method involves cutting two squares of fabric, placing them right sides together, drawing a diagonal line, and sewing directly on the diagonal line. After cutting ¼” from the diagonal line, your HST will be complete. Although this method is precise, it is time-consuming and can waste fabric. However, it is ideal for small-scale projects where accuracy is crucial.
Math for One at a Time HST
The math to figure out the cut size of your square is simple because it is simply the finished size of the square + ½” seam allowance.

Creating Half-Square Triangles: Two at a Time
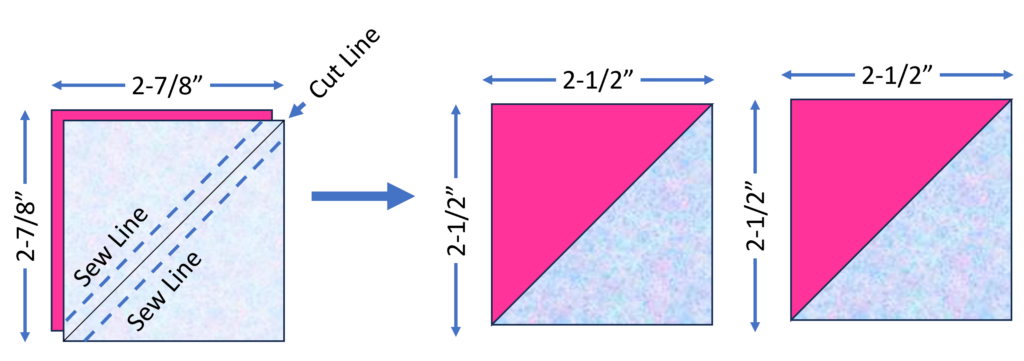
The two-at-a-time method is similar to previous HST. However, you will start with two larger squares, and mark down the center. But then, you will sew a scant ¼” on either of the marked line. Then, you cut them diagonally on your original marked line to create two pairs of HSTs. This method is faster than the one-at-a-time approach while maintaining precision.
Math for Two at a Time HSTs
The math to figure out the cut size of your square is the finished size of the square + 7/8”. Now some people just round up to 1” instead of 7/8”. If you do this, the block will need to be trimmed to the unfinished size after sewing.

Creating Half-Square Triangles: Four at a Time
The four-at-a-time method involves sewing a ¼” seam around the two squares and then cutting on the two diagonals from corner to corner. I’ve tested two different methods for this which is explained under the Math section for this block.

Math for Four at a Time HSTs
I’ve tested two different math methods of this block. The first method does create a little more waste than the second version, but I feel that it is a little easier to get the right size block. The second version does not have as much waste.
Math for Method 1: To determine the cut size of your square take the finished size of the HST + 1/2” then double that number. For example, for a 2” HST, the equation would be (2 +1/2) x 2 = 5” square (shown above). You will need to trim to unfinished size when done cutting.
Math for Method 2: To determine the cut take the unfinished size and divide by .64 then round up to the nearest 1/4″. You will still need to trim to the unfinished size but not quite as much.

Creating Half-Square Triangles: Eight at a Time
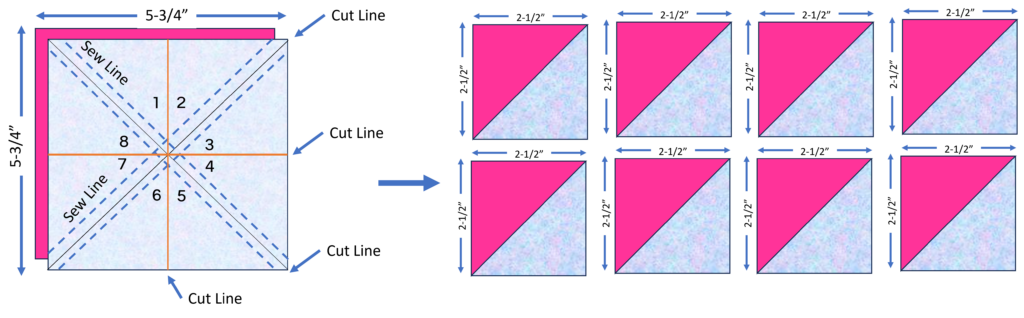
For larger projects, the eight-at-a-time method is a game-changer. By sewing together eight squares in a unique arrangement and making strategic cuts, you can produce eight HSTs in one go.
Math for Eight at a Time HSTs
The math to figure out the cut size of your square is double of what the two at a time HST is. To calculate the cut size of the fabric, take the finished size of the HST + 7/8” then double that number. For example, for a 2” HST, the equation would be (2 +7/8) x 2 = 5-3/4” square. Alternately, you can round the 7/8” to 1” and then trim this when done cutting.

Strip Method for Half-Square Triangles
Tube Method
Honestly, I do not like the tube method because it leaves the outside of your square with bias edges. This makes for difficult piecing due to the possible distortion of the block caused by stretching. I would much rather use the second method I’ll show you. However, due to fabric constraints, this may be an option. Starching your fabric could minimize the distortion that could happen. Use the 45° line on your ruler to make the cuts alternating the 45° from bottom edge to top edge.
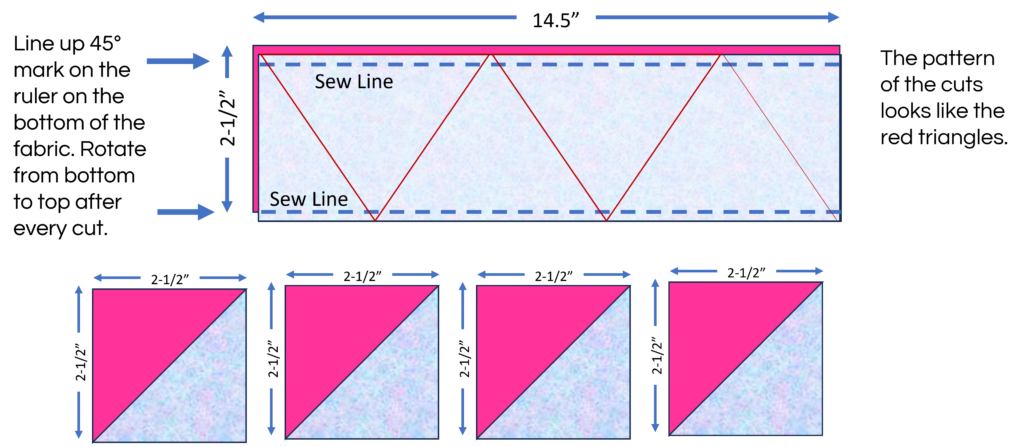
Math for Tube Method
The math to figure out the cut size of the width of the strip is a little tricky but with a calculator, it is easily figured out. Or, you could just enter the formula enter a search engine to get the results. Basically, take the unfinished size multiplied by the square root of 2. Then round up to the nearest 1/8” or 1/4″. Then multiply that by the number of blocks you need. For example, the unfinished size of our block is 2.5” x 1.414 = 3.535 so I round up to 3.625 or 3-5/8”. Now multiply that 3.625 by the number of blocks which is 4 to get the length of strips needed. That equals 14.5”.

2-at-a-time Strip Method
The second method is simply taking the 2-at-a-time method and marking the strip then sewing alternately diagonals. Either one of these approaches is perfect for making a large number of HSTs quickly.
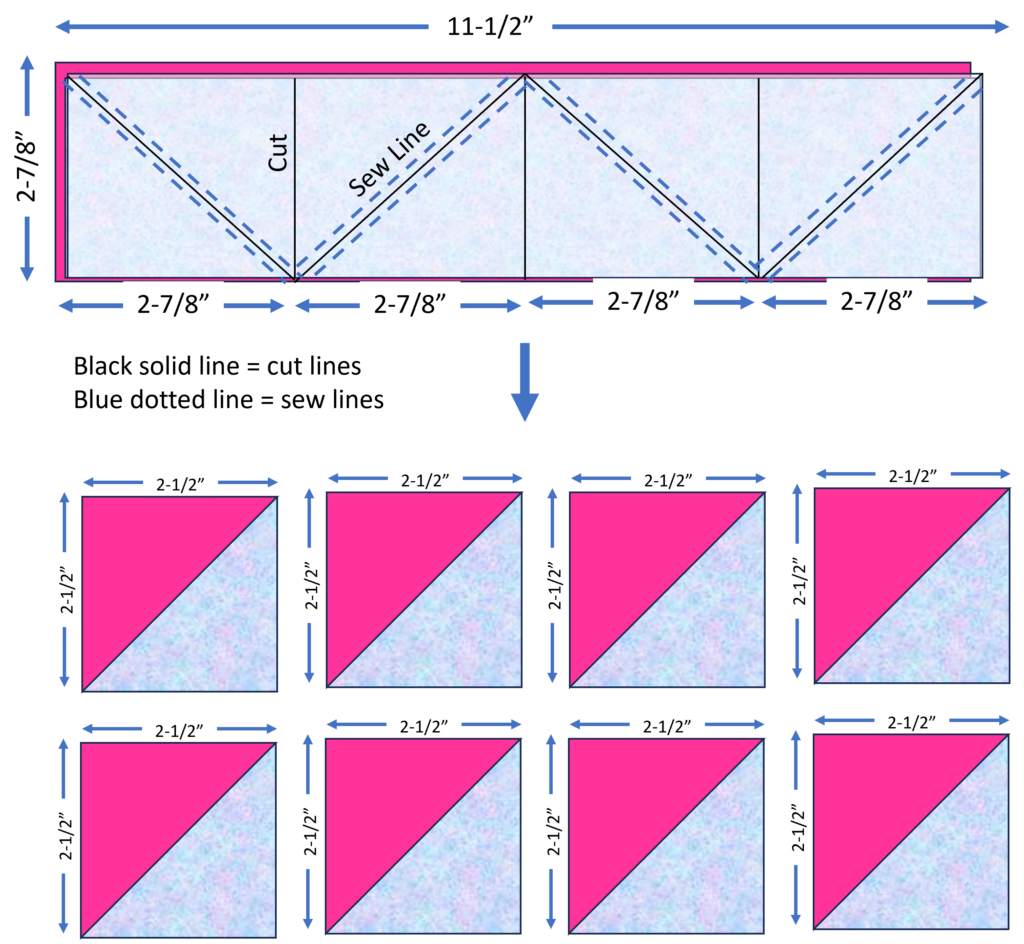
Math for 2-at-a-time Strip Method HSTs
The math to figure out the cut size of your square is the finished size of the square + 7/8”. For example, for a 2” HST, the strip height needs to be 2-7/8” (2 finished size + 7/8”). The length (or width) of the strip would be the height of the HST (in this case, 2-7/8”) times the number of HSTs needed. In our example we need 8 HSTs so we would multiply 2-7/8” by 4 getting a strip length of 11-1/2”. The reason we multiply by 4 is that each square gives us 2 HSTs. Now some people just round up to 1” instead of 7/8”. If you do this, the block will need to be trimmed to size after sewing. Using the same example above, the HST would be (2” + 1”) x 3 = 12”.

In conclusion, the method you choose for creating half-square triangles depends on your project’s size, complexity, and your personal preference. For intricate, small-scale projects, the one-at-a-time method provides the highest precision. On the other hand, for large-scale quilts and efficient production, the eight-at-a-time, sheeting, or strip methods are your best options. Experiment with these techniques to find the one that suits your quilting needs, and don’t be afraid to mix and match as your skills grow. Half-square triangles are a versatile tool, and mastering different methods will open up a world of creative possibilities in your quilting journey.
